Read this article on Medium
Introduction
Although the graphical Ubuntu Installer gives the option to automatically partition your existing Windows partition, there is a risk of corrupting your Windows installation. Manually partitioning your drive gives you more control over your Ubuntu installation. This tutorial will guide you through the process of partitioning your drive and installing Ubuntu 22.04. The tutorial is designed specifically for UEFI systems.
NOTE: If you are reading this tutorial, you should have already prepared a boot-able USB with the Ubuntu 22.04 image on it. Ubuntu offers a brief but well-written guide on doing this.
Step 1: Shrinking your Windows Partition
Before booting into the live Ubuntu environment, you must allocate some space for the Ubuntu installation.
First open Disk Management on Windows by right clicking the start button and selecting “Disk Management”
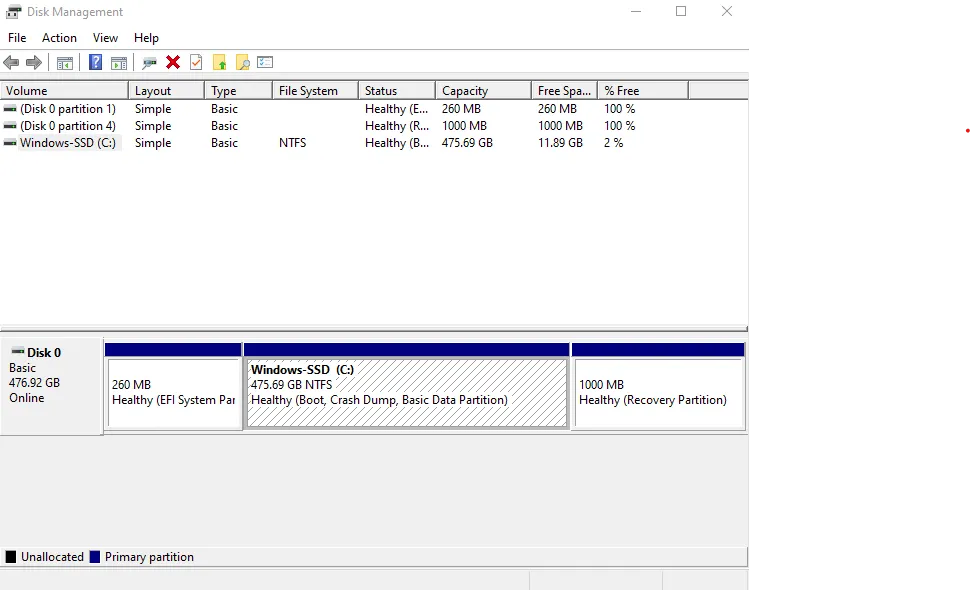 Windows Disk Management
Right-click on the large box that contains information about your Windows partition. Select “Shrink Volume”. Ubuntu recommends at least 8GB for your installation, but it is recommended to have at least 15000MB. Then select “Shrink”.
Note: I will be doing the tutorial through a Virtual Machine, above is my actual Windows installation which is almost full. That’s why the “Shrink” option is grayed out.
After this is completed, you should see an unallocated partition next to your Windows installation.
Step 2: Load the Ubuntu Live Environment
As mentioned before, this tutorial does not cover how to create a boot-able USB so if needed refer to this guide from the Ubuntu docs.
First, you are going to need to boot into the Ubuntu 20.04 Live Environment. To do so, you will need to hit one of the following hotkeys immediately after powering on your computer.
From, “How to Boot from a USB Drive on Windows 10 PCs” by Michelle Wilson and Tulie Finley-Moise, the following hotkeys will open a menu prompting you to select where you want to boot from. In these menus, use your arrow keys/enter key to navigate.
Acer: F2 or DEL
ASUS: F2 for all PCs, F2 or DEL for motherboards
Dell: F2 or F12
HP: ESC or F10
Lenovo: F2 or Fn + F2
Lenovo (Desktops): F1
Lenovo (ThinkPads): Enter + F1
MSI: DEL for motherboards and PCs
Microsoft Surface Tablets: Press and hold volume up button.
Origin PC: F2
Samsung: F2
Sony: F1, F2, or F3
Toshiba: F2
After selecting your boot-able USB stick from the menu, the Ubuntu boot sequence should start. Once the Ubuntu Live Environment has loaded, select the option “Install Now”.
Step 3: Partitioning and Installation
Now, we can begin our installation.
The first few slides in the installation window prompt you for your language, keyboard layout, and installation preferences. I prefer a minimal installation because it takes less space. Additionally, you can choose to download updates while installing Ubuntu (I recommend) and install graphics, Wi-Fi firmware, and additional media formats. Sometimes you may run into the issue of missing a driver or media codec, so selecting the latter can help prevent an issue like that.
Ubuntu 22.04 Installation Options
Then, in the next slide, you will be prompted to select an Installation type.
Because I am installing through a virtual machine, I am not presented with an option to automatically install alongside Windows 10/11, so ignore the selected option above and select “Something Else”!
Here, you want to select “Something Else” and then hit “Install Now”.
Now, moving on to the partitioning. Firstly, you want to right-click on the partition that is unallocated. This will likely be under one of the following names: /dev/sda, /dev/sda1, or /dev/sda2.
Next to the partitions that are in the list, there should be one that has the same amount of space as the amount that you allocated in Step 1. Right-click on this partition and select “New Partition Table”. Do NOT do this to any partition that has the type NTFS because that indicates that it belongs to your Windows installation.
After selecting New Partition Table, it should show underneath it, “free space”.
Now, you want to right-click on your new free space and select “Add”. You will now be prompted to create a new partition.
Here, I am allocating all of my free space to the root partition (/).
The simplest and probably the best approach would be to create a single ext4 partition and allocate all of your free space to it (mounting it to /, your root partition). This will work well for most people. Ensure that you have selected the options as detailed in the picture above. Then, you want to select “OK” and let the installer create the partitions. You should now see an ext4 partition with the mount point / and the size of however much you entered previously.
Optionally, you might want to create a separate home partition. In that case, you should allocate ~15–20GB for the root partition and the rest of your space for the home partition.
Note: Your root partition contains all of the files for the operating system and your home partition will contain all of your personal files. Therefore you should make sure you have allocated enough space to your home partition.
For the device for boot loader installation, you want to select your drive. This will create a boot entry in your UEFI system.
When you are ready, select “Install Now”.
Step 4: Post-Install and Adding Windows Boot Loader to GRUB
When you reboot your system you should see the GNU GRUB Boot Loader appear. It should prompt you to select either Ubuntu 22.04 or Windows 10/11. If you do not see this DO NOT PANIC. Your Windows installation is still there, it’s just that GRUB doesn’t see it. You can always select one of the hotkeys in Step 2 to be presented with the option to boot into Windows 10/11, but that isn’t very practical.
To fix this issue, you want to edit /etc/default/grub and add the following line to the file:
GRUB_DISABLE_OS_PROBER=false